Are you using software to track your conversions? Or does the conversion tracking software need to reflect optimum results?
You might also be looking for precise software to monitor website visitor activity. Investing in a link-tracking solution that supports your company’s expansion is necessary if you’re interested in tracking and raising your website’s conversion rates.
In the cutthroat market, the need for a conversion tracking tool has become crucial. Your business will stall if you don’t understand and analyze your best and worst traffic sources and identify crucial features on your website that encourage conversions.
There are chances that you will be stuck in a “marketing no man’s land” unable to take your business in the right direction due to the:
- Inability to make vital changes on your landing page because you need to be made aware of the elements driving potential customers to convert.
- Difficulty in adjusting funnel set-up as you need to differentiate between parts working efficiently and those leaking traffic.
- Difficulty deciding which traffic sources are best for your conversions because you need to know which ones are bringing in real conversions.
Thus, it has become imperative to invest in a conversion tracking tool. ClickMagick is one such click-tracking and optimizing tool.
Affiliate Disclaimer: I earn commission (get paid) if you click on the links and purchase a product below. My earnings do not impact the price you pay.
What is ClickMagick?
The success of your marketing campaign owes a lot to excellent data analysis and appropriate execution. While you can crunch numbers and manually create a database, this process can get tedious and monotonous, using up most of your hours.
At the same time, there are different tools available for tracking various campaigns. A HubSpot survey found that for most businesses in North America in 2020, the most common marketing metrics tracked included Website Traffic and social media engagement.
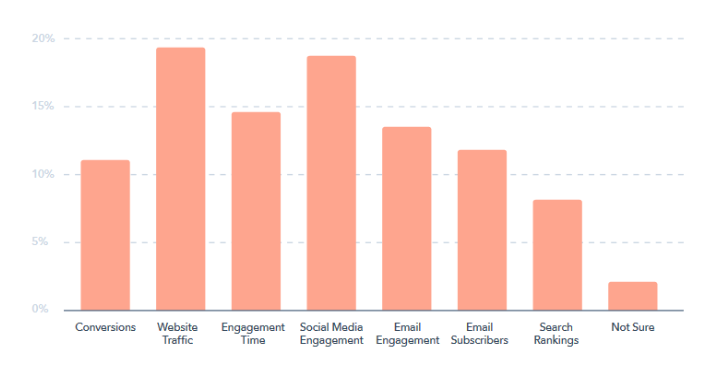
Therefore, ClickMagick provides an easy solution to crunching vast numbers and resolves the need to use different tools for tracking various campaigns. ClickMagick is an all-around software built to manage and measure marketing tools to improve your ROI.
It is software enabled with various features that will help you track multiple links on any platform or device. ClickMagick offers various services that are unique and not available to its competitors, including tracking entire sales funnels.
Using ClickMagick ensures that you no longer need to search for alternative tools to track your advertisements across different platforms. It works well on virtually all advertising platforms, including LinkedIn and Instagram.
ClickMagick’s multi-platform compatibility with the added cross-device tracking feature helps your business target and retarget potential customers across various advertising/social media platforms on multiple devices.
Thus, it will, in turn, will help to increase your visibility and drive you toward growing conversions.
ClickMagick is an all-in-one tracking and optimizing tool to help your business. Here are some features of the tool:
- Help in easy conversion tracking (for any action or sale)
- It helps add retargeting pixels for links
- Helps monitor click fraud and traffic quality analyzing
- Helps conduct A/B split testing ensuring instant winner alerts
- Helps build dynamic affiliate links and link cloaking
- Possess multi-mode link rotators
This guide will familiarize you with some of the features of ClickMagick, so you can grasp website traffic and visitor conversions on your business.
My Personal Experience With ClickMagick
Tools I Used For My Campaign
- Leadpages – For Landing Page creation.
- ClickMagick – For Tracking.
- WPEngine – Where I host my website. Also, see the best website hosting article for more web hosting options.
If you need to know how to get your offer in front of more people, I recommend reading the Traffic Secrets book.
- Started the free trial on October 17, 2022.
- Easy process to sign up and get started.
- Had to provide a credit card, but it was not charged due to the free trial.
- Initially signed up for the Starter Plan, but decided to do the Standard plan during the 2 weeks Free Trial to test out more features
- On October 24th, I wanted to test more offers than 5 so I upgraded to the Pro plan for unlimited funnel tracking. This still fell under the free trial period.
My First Campaign Setup Experience (ClickBank)
I watched the Getting Started Videos, read Knowledge Base articles, and watched YouTube videos (Note: ClickMagick doesn’t recommend following YouTube video instructions because the information may be old or incorrect. They prefer customers to use the ClickMagick Knowledge Base and Helpdesk). I was ready to begin setup for my first campaign in about 30 minutes after doing this research
Then I went to Campaigns > New Project and simply followed the step-by-step tutorial that walked me through setting up the campaign. It walks you through setting up a complete funnel, but I was only using a simple landing page and then the ClickBank offer so I skipped through most steps.
Once the campaign was set, I ran traffic to my offer for a day and noticed I had a sale in Clickbank that did not show up. After researching, I found the issue to be that I added the wrong code to the end of my offer link/URL. The ClickMagick Postback Log tool was helpful in identifying the issue.
Later, I saw a ClickBank refund show up in the Postback Log so I knew everything was working correctly. Then I went ahead and created more Campaigns until I reached the 5 Campaign limit.
The next day 2 sales showed up. 1 in ClickMagick and the Postback Log, and the other in the Postback Log only. The Knowledge Base said this could be from a different traffic source or someone that was already going through the offer sequence prior to me using ClickMagick.
Example Postback Log Output when working correctly.

Example Postback Log Output when not working correctly.

I wanted to create more campaigns so I upgraded to the Pro plan. This gave me unlimited campaigns.
Important Things to Consider When Setting Up a ClickBank Campaign
Take notes as you set up the Campaign to make sure you know all the key steps for setup for your future campaigns. It’s easy once you do a couple of campaigns. I initially only set up 1 campaign on the first day. I wanted to make sure everything worked correctly when I sent traffic to my offer. Once that was good, I created more campaigns.
Tracking a ClickBank Campaign (Checklist)
- Setup ClickBank Integration so ClickMagick can track your sales using the ClickMagick Postback URL Tool
- Add tracking code to your landing page
- Add a campaign ID code (Click ID) to the end of your ClickBank offer. For ClickMagick Campaigns, I needed to add “?tid=[cmc_vid]”
- Add Tokens to your Campaign link to capture all information you may need
- Setup Cost so you can track campaign profitability
What a Simple Clickbank Campaign Looks Like
- Leadpages > Clickbank Offer
Things I Like About ClickMagick
- Easy to use
- Good training and Knowledge Base
- Opens your eyes to what’s actually working with your marketing
- Link Rotators to test multiple offers
- Works without needing to change your website link. With Campaigns, your tracking link is your website link with some added variables
Things I Don’t Like About ClickMagick
The Starter Plan has a 1 Funnel Tracking Project limit. The Standard Plan has a 5 Funnel Tracking Projects limit. You must upgrade to the Pro plan for Unlimited Funnel Tracking.
Key Functions of ClickMagick
Below are a few pointers on using essential ClickMagick functions to manage website traffic and generate conversions.
1. Integrating Custom Domain with ClickMagick
Although ClickMagick provides you with a generic domain name and a URL, it is advisable not to use them. Two reasons mainly fuel this is—
- Possibility of losing out on brand consistency as the domain name does not reflect your brand.
- There may be users involved in malpractices using the generic domain and URL, which might lead everyone using the domain to pay the penalty.
Therefore, a customized domain name and URL are safer for your business.
Steps to Set up Your Domain Name on ClickMagick
Depending on where you have registered your domain, you will work with a DNS setting or a cPanel dashboard. Registering with one of the big-name registrars makes you eligible to work with the DNS setting.
On the other hand, businesses that have pointed their domain to another host will work with the cPanel dashboard. To set up your domain, you will need the registrar account or host account dashboard open along with your ClickMagick account.
Once you are in the ClickMagick account dashboard, click on the following icons;
‘Tools’ → ‘Domain Manager’ → ‘Start Here’
Following these steps will lead you to the part of the dashboard where you will find instructions to start setting up your domain using your registrar or host account. Even though it is a tedious process, it benefits your business.
2. Creating Links
Once you set your domain name, the next part is the most crucial: tracking links.
You will have to create new links for every offer and modify the existing links to add any variations to the offers already made. Once you are in your ClickMagick account dashboard, click the following instructions;
‘Links’ → ‘Create New Link’ → ‘Create Link Manually’
Once you have familiarized yourself with the process, it is relatively easy to carry out. At the same time, tiny question marks are beside each box, and the ‘Help’ option provides further guidance throughout the process.
Adding the link to your ClickMagick account allows the tool to track all clicks on the link.
3. Creating Link Groups
You may skip this step if your business requires you to track only a few links. However, when managing more prominent companies that demand you to follow multiple links and various offers simultaneously, this function will be your savior.
Once you are in the ClickMagick account dashboard, you will find the following;
‘Tools’ → ‘Group Manager’
Following the step, you will find yourself on the page “Link and Rotator Groups”. This function is relatively simple and allows you to choose a name for the groups of links as per your preference.
4. Tracking Traffic Sources
Do you need help determining suitable traffic sources for your website? Or are you not aware at all?
Well, you are not alone in this struggle. Most businesses try to track their traffic metric by creating a new link for every new space that represents a traffic source. ClickMagick eases this tedious and messy process with the ‘Sub IDs’ function.
Steps to avail of the feature in ClickMagick;
- Copy and paste the link that you wish to track,
- Add the platform name at the end of the link. For example, if you are using it on Facebook, add /FB at the end of the link,
- If you wish to track the emails, add /email at the end of your link.
Here’s what to note
When you add the backslash and the identifying key (Sub ID), the identifying text can be anything you want. Once you add the additional text/ Sub ID, you can track the platforms from where you get the most clicks for your business.
The numbers from multiple platforms will be tracked into your ClickMagick dashboard with the Sub IDs attached.
5. Tracking Pixels and Setting them up
You must use tracking pixels to understand how many people are visiting your website’s sales and landing pages. It also helps you track the number of customers taking the action you intended.
ClickMagick has made tracking pixels hassle-free for businesses. Once on your account dashboard, follow the following steps;
‘Tools’ → ‘Tracking Pixels’ → ‘Pixel Builder’
Following these commands will land you on the page “Tracking Pixel Builder”. You may choose the page by clicking the buttons according to your needs.
When tracking WordPress sites, select the ‘Image/HTML’ button. It will help you generate the Pixel code, which you can now apply to your target page. However, for tracking pages like ClickFunnel, you must use the ‘Java Script button.
6. Tracking Affiliate Link Sales
Tracking affiliate sales is essential for those involved in affiliate marketing. ClickMagick helps affiliate marketers track sales from each affiliate network and the money each program makes.
Once you are in your account dashboard on the software, follow the following steps;
‘Tools’ → ‘Postback URL’s → ‘Postback Builder’
When you click Select Affiliate Network, you will find a list of options. Next, you must find the network you want and press ‘select network’.
Selecting your desired network will give you a complete track of all the required details, including,
- Pages that most people are landing on;
- Links receiving the most clicks;
- The link clicks that are making the most sales;
- Money generated by the sales for you
7. Cloaking Affiliate Links
Clocking affiliate links is a unique function and can be used by only those whose affiliate programs allow cloaking affiliate links. You risk being kicked out if your affiliate program does not allow this function.
Hence, apply caution when using this feature!
8. MagickPops
MagickPops allows you to create pop-ups for your dashboard. It will enable you to create four different pop-ups: ‘on-load’, ‘on-exit’, ‘delayed’, or ‘redirect’.
Use the following instructions to create pop-ups once you reach your ClickMagick account dashboard;
‘Content’ → ‘MagickPops’ → ‘Create New Pop’
It will lead to a visual editor where you can create and edit your pop-ups. You can also add tables, YouTube videos, images, and more according to your needs to the pop-ups.
9. MagickBars
You may place a MagickBar at the top or bottom of your landing pages. It acts as a timer and can only be removed once the visitor clicks on it. You can create this function using a visual editor, allowing you to edit and develop bars with numerous options.
10. Timers Feature
The Timer feature is an excellent tool as it can be easily used on most landing pages and funnel builders. It helps you to add scarcity features to your offers using the steps as follows;
‘Content’ → ‘Timer’ → ‘Create New Timer’
These steps will lead you to a dashboard where you can generate a code by putting in the required details. You can use these codes on your web pages, both new and existing.
Some More Assorted Functions on ClickMagick
There are some more features that you can explore on the ClickMagick tool. These include;
- Automatic Bot Filtering: Bots can mess up your traffic stats; thus, ClickMagick filters the bots so that you may get accurate traffic stats for your websites.
- GEO and Mobile Targeting: It allows you to send visitors to pages depending on their geo-locations or the device with which they are accessing your websites.
Automatic Traffic Quality Analysis: You can track the traffic from each of your offers using the Traffic Quality Analysis feature. It provides your traffic quality scores for the different links, allowing you to compare the traffic that each link invites to your business.
Who can use ClickMagick?
Using ClickMagick can benefit numerous businesses depending on their service and products.
Affiliate Marketers
You may be involved in affiliate marketing or a professional looking for a thrust for your business. ClickMagick is the ideal tool for affiliate marketers to target pages from different affiliate platforms, handing you the most accurate data from any industry or niche you require.
Small Advertisers
ClickMagick allows small advertisers to cycle through various links using its unique ‘Rotator Function’. As a small advertiser, you do not have to worry about changing any codes or configurations and can perform your tasks hassle-free.
Blogger
If you are a blogger, then using ClickMagick allows you to track the effectiveness of your mailing lists. You may also use the tool to boost sign-ups and sales by analyzing the data and drawing practical conclusions.
E-Commerce Businesses
If you own an e-commerce site that sells products and services, you can use ClickMagick to gauge the success of your advertising campaigns and product landing pages. After analyzing the data, you can change the product pages according to the results.
If your business involves selling products, services, or experiences over the internet, you can use the ClickMagick tool to attract more clicks and increase conversion rates.
ClickMagick Pricing
You can visit the ClickMagick site and sign up to avail of their services. ClickMagick allows you to try their services for free, or you can subscribe to their plans divided according to the number of clicks they allow per month and the access to different features.
You can choose from any of the following plans;
- Starter Plan: The starter plan costs $37 per month and includes all the core features plus 10,000 clicks per month. You will also get 1 team member slot, 1 funnel tracking project, 2 custom tracking domains, and 6-month data retention along with this plan.
- Standard Plan: The standard plan costs $97 per month. This plan includes all the standard plan features with more limits and of course a few additional features like cross-device tracking, auto cost update, audience optimization, etc.
- Pro Plan: The pro plan costs $197 per month. You will get unlimited access to all the features and 2-year data retention.
Conclusion
ClickMagick is an excellent tool that helps you track and manage all your traffic on various platforms. It will help increase your conversion ratio, guaranteeing more profits.
You will be assured of the quality of the tracking software. ClickMagick allows you to sign-up for free trials for 14 days to check out their services before you commit to the tool.
You may decide to test different software to track your website traffic. However, ClickMagick is capable of providing a comprehensive and top-notch service.
Recent Post
Kartra and Leadpages both help you grow your business online fast. But they serve different purposes, so the choice really depends on you. Kartra is
A membership site gives content only to people who sign up first. It’s great for courses, training, digital products, or private communities. You control who
Kartra is an all-in-one platform made for online businesses. It helps you build, launch, and grow your business from one place. You don’t need ten
